
Today I bring you a list of science experiments for high school with which you can learn concepts of physics, chemistry and biology. To do scientific experiments means to visualize the phenomena and to corroborate the theories; they also represent the opportunity to become familiar with the scientific method.
All experiments are easy to perform and use equipment and materials of daily use. For the interpretation of the results, at least one level of secondary education student is required.
-1.5V alkaline batteries (2 or 3 batteries)
-Battery holder
-Thin and enameled (varnished) copper wire for windings.
-Steel bolts.
-Iron nails.
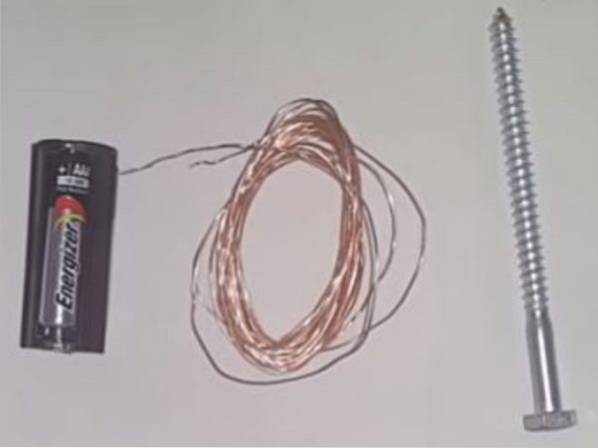
-Wind the enameled copper wire around one of the steel screws.
-With a cutter or a knife scrape the varnish from the free ends of the copper wire that was wound on the steel screw.
-Place the batteries in the battery holder and connect the ends to the terminals of the battery holder.
-Bring the tip of the screw closer to the nails and observe that they are attracted.
-Note that when disconnecting the cable from the winding the electromagnet stops working.
-Increase the power of the magnet by connecting more batteries in series.
-Increase the magnetic field of the electromagnet by placing more turns of winding.
-Magnetic force is greater the more current.
-With the same current the magnetic force increases if the number of turns increases.
-With the same number of turns (each turn is a turn) and current, the power of the electromagnet increases if the turns are tightened or approach each other.
-If the screw is unscrewed and the coil is left alone, the magnetic effect continues but is substantially weakened.
-On the sheet of paper draw a spiral.
-Cut out and make a small hole in the center of the spiral.
-Pass the piece of thread through the spiral. Tie a knot at the end of the thread so that it does not come out of the spiral.
-Lift the spiral with the thread, so that a helix is formed.
-Turn on the candle.
-Place the paper helix already suspended by the thread, over the lit candle.
Caution: the paper propeller must be away from the flame, so that it does not ignite.

-Notice that the helix begins to rotate. The reason is the updraft of hot air. Hot air rises because it is lighter than cold air.
-Increase the turning speed by placing two candles instead of one.
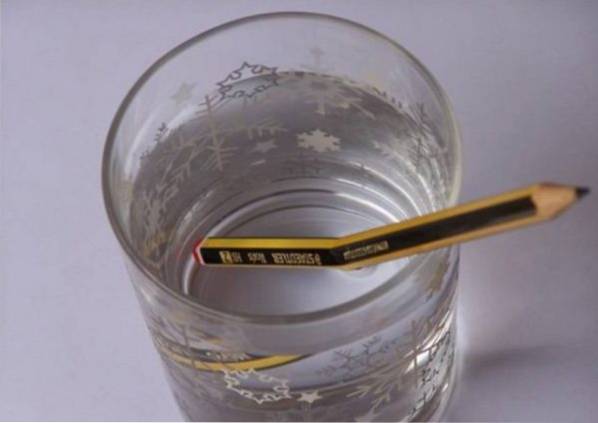
-A glass tumbler
-A jug of water
-A coin
-A pencil
-Place the coin on the table.
-Then put the glass cup on the coin.
-Look at the coin under the glass, from an oblique position and from above.
Now pour water into the glass and repeat the observation from a side angle and from above.
-When the glass is empty the coin can be seen through the glass both from the side and from above. But if the glass is filled with water while we look at the coin from a 45º angle, we notice that it suddenly disappears from our sight..
-If we look directly from above we notice that the coin is still there. The phenomenon is explained by the fact that light is deflected when it passes from one medium to the other..
-When water is added at the interface between the glass and the water, there is a deviation of the light grazing to the bottom of the glass and therefore the coin is not displayed.
-Now place the pencil in the glass of water so that one part is submerged and the other in the air.
-Look at the pencil from the side: it looks like it has been broken. Again the explanation of this phenomenon is the deviation suffered by a light ray when it passes from one medium to another..
-We fill the syringe with water.
-We support the wings of the syringe to the walls of the two vessels that will act as columns and support for the syringe..
-Squeeze the syringe gently until a drop forms at the tip that is held by surface tension at the edges of the syringe tip..
-Pass the adhesive tape around the laser button so that it is lit.
-Point the laser light at the drop and see the projection on the wall.
-Rub the sewing needle carefully, without pinching, on the inside wall of the mouth.
-Touch with the tip of the needle previously rubbed in the mouth, the drop of water on the tip of the syringe.
-Observe the projection and notice the differences.
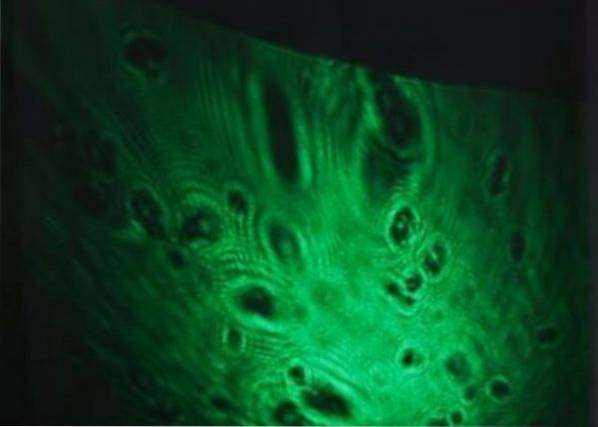
-When the laser light is projected on the wall, the germs in the mouth are amplified.
-You can repeat the experiment, using water from a vase for the syringe, which may contain microorganisms such as paramecium and amoeba..
-Lemons
-Copper coins, or bare copper wire.
-Galvanized bolts
-Voltmeter
-Cables
-Alligator Cable Clips
-A lemon is taken and a piggy-style slot is made to insert the copper coin.
-On the opposite side the galvanized screw is screwed and inserted.
-Fit and connect alligator clips to voltmeter leads.
-The positive alligator connects to the copper coin.
-The alligator of the negative of the voltmeter connects to the galvanized screw.
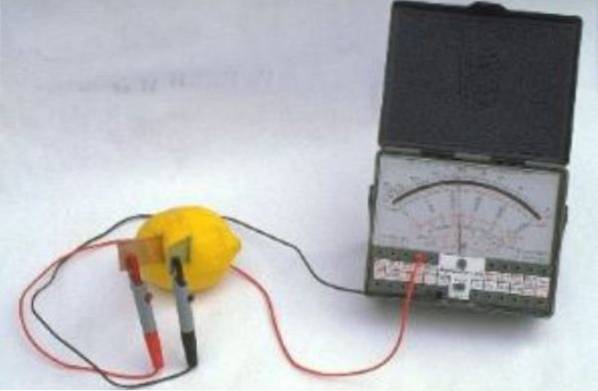
-Measure the voltage produced by the lemon battery. This voltage should be a little less than one volt.
-Build a second and third lemon battery, connect in series and check voltage.
-Try to light a flashlight bulb. Try one or more lemon stacks in series.
-Now connect the lemon stacks in parallel. Check voltage.
-Apply the parallel combination of lemon batteries to the flashlight bulb.
-Draw your conclusions.
-Glass containers
-Distilled water
-Purple cabbage
-Filter paper
-Cooking pot
-Kitchen
-Glass container
-Cut the purple cabbage.
-Cook the cabbage pieces in a pot for 10 minutes.
-Remove from the burner and let it rest until cool..
-Strain or filter into a clean container, preferably glass.
-Save the liquid extracted from the purple cabbage, which will serve as a pH indicator.
-The pH indicator works like this:
i) For an acidic substance it turns from pink to red in color.
ii) If it is a neutral substance, it maintains its dark blue color.
iii) When tested on alkaline or basic substance, it turns green in color.
-Acids that are safe to handle: vinegar and lemon juice.
-Cola soda
-Tomato
-Human urine
-Pure water
-Saliva
-Salt water or sea water
-Sodium bicarbonate.
-Toothpaste
-Milk of magnesia
-Household bleach or ammonia (wear plastic gloves, do not touch with hands or clothing)
-To do the tests it is useful to make some strips of absorbent paper that are impregnated with the pH indicator.
-Write down in a notebook, classify in descending order, from the most acidic substances to the most alkaline.
Caution
Very strong acids and bases can cause burns and irritation to the skin, mucous membranes and eyes. It is advisable to wear plastic gloves throughout the experiment, especially if you have sensitive skin.
-Chicken livers
-Liquid dishwashing detergent
-Meat tenderizer enzymes, such as papaya juice or powdered meat tenderizer.
-Ethyl alcohol without dye
-Blender
-Glass bottle
-Fine strainer
-Beaker with graduations
-Long glass container or test tube.
-Place raw chicken liver in the blender glass.
-Add a little water and blend until you get a creamy paste.
-Pour the liquefied liver through a strainer into the graduated beaker.
-Measure the amount of smoothie in the container.
-It is poured dishwasher, in a measure equal to a quarter of measure of the liver smoothie.
-Stir with a spoon.
-Add a tablespoon of meat tenderizing enzymes or papaya juice and stir for five minutes.
-Stir gently so the DNA strands are not broken.
-The mixture is poured into an elongated glass test tube type container..
-Tilt the test tube and carefully pour in the alcohol so that it does not mix with the liquid at the bottom.
-After a few minutes, you can see white filaments inside the alcohol, coming from the mixture of liver, detergent and enzymes. Those strands are the chicken's DNA.
-Glass or plastic jar, such as mayonnaise.
-Punched plastic insulating cap through which a rigid wire or cable will be passed.
-Rectangular strips of kitchen foil to cover, glue or adhere the outside and inside of the jar.
-A flexible cable without insulation that is spliced to the inside of the rod so that it makes contact with the aluminum foil that covers the inside of the wall of the bottle
-It is important that the aluminum coating does not reach the edge of the bottle, it can be a little higher than half.
- Uninsulated wire to be bonded to the outer aluminum foil.
Note: Another version that avoids the work of placing the aluminum foil on the inside, consists of filling the bottle or jar with a solution of water and salt. which will act as an interior plate.
-If you have an old TV or monitor with a cathode ray screen you can use it to charge the bottle.
-Hold the bottle with one hand by the outer plate, while approaching and touching the screen with the cable that connects to the inner part.
-Then take the cable tied to the outside and bring it closer to the cable that comes from the inside of the bottle.
-Observe that when you bring the cable connected to the outside with the one that comes from the inside, a spark is produced, showing that the bottle has been electrically charged.
-If you do not have a suitable screen, you can load the Leyden bottle by holding it close to a woolen cloth that you have taken from the clothes dryer..
-Another option for the charging source is to take a piece of plastic tube (PVC) that has previously been sanded to remove the varnish. Rub the tube with a paper towel until it acquires a sufficient charge.
-Lift
-Bathroom scale or weight
-Notebook
-Take a bathroom weight into an elevator, stand on it, and record the values you set during the up start, the down start, and during the time it is moving at constant speed..
-Now apply Newton's second law, for this draw a force diagram and solve for the acceleration of the elevator.
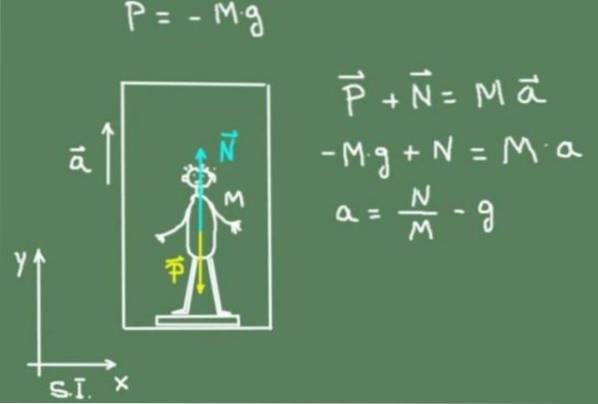
-Calculate the elevator accelerations for each case.


Yet No Comments