
A electroscope It is a device used to detect the existence of electrical charges on nearby objects. It also indicates the sign of the electric charge; that is, if it is a negative or positive charge. This instrument is made up of a metal rod confined within a glass bottle..
This rod has two very thin metal sheets (gold or aluminum) connected in its lower part. In turn, this structure is sealed with a cover made of insulating material, and at the upper end it has a small sphere called a "collector".
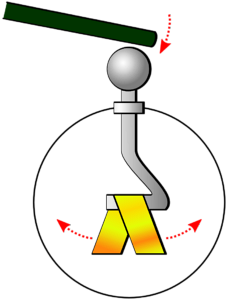
When approaching an electrically charged object to an electroscope, two types of reactions can be witnessed by the metal lamellae at the lower end of the configuration: if the lamellae are separated from each other, it means that the object has the same electrical charge that the electroscope.
On the other hand, if the lamellae come together it is indicative that the object has an electrical charge opposite to the charge of the electroscope. The key is to charge the electroscope with an electrical charge of known sign; Thus, by discarding it will be possible to deduce the sign of the electric charge of the object that we bring to the device.
Electroscopes are extremely useful for determining whether a body is electrically charged, as well as giving clues about the sign of the charge and its intensity..
Article index
The electroscope was invented by the English physician and physicist William Gilbert, who served as a physicist for the English monarchy during the reign of Queen Elizabeth I..
Gilbert is also known as "the father of electromagnetism and electricity" thanks to his great contributions to science during the seventeenth century. He built the first known electroscope in 1600, in order to deepen his experiments on electrostatic charges.
The first electroscope, called versorium, was a device consisting of a metal needle, which rotated freely on a pedestal.
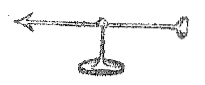
The configuration of the versorium was very similar to that of a compass needle, but in this case the needle was not magnetized. The ends of the needle were visually differentiated from each other; Furthermore, one end of the needle was positively charged and the other was negatively charged.
The mechanism of action of the versorium was based on the charges induced at the ends of the needle, through electrostatic induction. Thus, depending on the end of the needle that was closest to the neighboring object, the reaction of that end would be to point or repel the object with the needle..
If the object was positively charged, the negative moving charges on the metal would be attracted towards the object, and the negatively charged end would point towards the body inducing the reaction in the versorium.
Otherwise, if the object had a negative charge, the pole attracted to the object would be the positive end of the needle..
In mid-1782, the prominent Italian physicist Alessandro Volta (1745-1827) built the condensation electroscope, which had an important sensitivity to detect electrical charges that the electroscopes of that time did not detect..
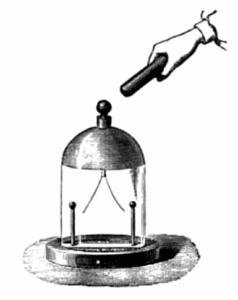
However, the greatest advance of the electroscope came from the hand of the German mathematician and astronomer Johann Gottlieb Friedrich von Bohnenberger (1765-1831), who invented the gold-foil electroscope..
The configuration of this electroscope is very similar to the structure that is known today: the device consisted of a glass bell that had a metallic sphere at the upper end.
In turn, this sphere was connected through a conductor to two very thin sheets of gold. The "golden loaves" separated or joined each other when an electrostatically charged body approached.
An electroscope is a device used to detect static electricity in nearby objects, making use of the phenomenon of separation of their internal lamellae due to electrostatic repulsion..
Static electricity can be accumulated on the external surface of any body, either by natural charge or by rubbing..
The electroscope is designed to detect the presence of these types of charges, due to the transfer of electrons from highly charged surfaces to less electrically charged surfaces. In addition, depending on the reaction of the lamellae, it could also provide an idea of the magnitude of the electrostatic charge of the neighboring object..
The sphere located in the upper part of the electroscope functions as a receiving entity for the electrical charge of the object of study..
By bringing an electrically charged body closer to the electroscope, it will acquire the same electrical charge as the body; that is, if we approach an electrically charged object with a positive sign, the electroscope will acquire the same charge.
If the electroscope is pre-charged with a known electrical charge, the following will happen:
- If the body has the same charge, the metal lamellae inside the electroscope will separate from each other, as both will repel each other.
- In contrast, if the object has an opposite charge, the metal lamellae at the bottom of the bottle will remain attached to each other..
The lamellae inside the electroscope must be very light, so that their weight is balanced by the action of electrostatic repulsive forces. Thus, when moving the object of study away from the electroscope, the lamellae will lose their polarization and will return to their natural state (closed).
The fact of charging the electroscope electrically is necessary to be able to determine the nature of the electrical charge of the object that we will approach the device. If the charge of the electroscope is not known in advance, it will be impossible to determine if the charge of the object is equal to or opposite to said charge..
Before charging the electroscope, it must be in a neutral state; that is, with the same number of protons and electrons inside. For this reason, it is suggested to connect the electroscope to ground before charging, to ensure the neutrality of the device's charge..
The electroscope can be discharged by touching it with a metallic object, so that the latter drains the electrical charge inside the electroscope to the ground..
There are two ways to charge an electroscope before testing it. The most relevant aspects of each of these are detailed below..
It is about charging the electroscope without establishing direct contact with it; that is, only by approaching an object whose charge is known to the receiving sphere.
By touching the receiving sphere of the electroscope directly with an object with a known charge.
Electroscopes are used to determine whether a body is electrically charged, and to distinguish whether it is negatively charged or positively charged. Currently, electroscopes are used in the experimental field, to exemplify with their use the detection of electrostatic charges in electrically charged bodies..
Some of the most prominent functions of electroscopes are as follows:
- Detection of electrical charges on nearby objects. If the electroscope reacts to the approach of a body, it is because the latter is electrically charged.
- Discrimination of the type of electric charge possessed by electrically charged bodies, when evaluating the opening or closing of the metal lamellae of the electroscope, depending on the initial electric charge of the electroscope.
- The electroscope is also used to measure radiation from the environment in case there is radioactive material around, due to the same principle of electrostatic induction..
- This device can also be used to measure the amount of ions that are present in the air, by evaluating the rate of charge and discharge of the electroscope within a controlled electric field..
Today electroscopes are widely used in laboratory practices in schools and universities, to demonstrate to students of various educational levels the use of this device as an electrostatic charge detector..
It is very easy to make a homemade electroscope. The necessary elements are easy to acquire and the assembly of the electroscope is quite fast.
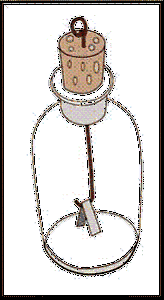
Listed below are the utensils and materials needed to build a homemade electroscope in 7 easy steps:
- A glass bottle. It needs to be clean and very dry.
- A cork to hermetically seal the bottle.
- One 14 gauge copper wire.
- A pliers.
- A scissors.
- Foil.
- A rule.
- A balloon.
- A woolen cloth.
Cut the copper wire until you get a section that is approximately 20 centimeters longer than the length of the container..
Curl one end of the copper wire, making a kind of spiral. This part will act as the electrostatic charge detecting sphere..
This step is very important, since the spiral will facilitate the transmission of electrons from the study body to the electroscope, due to the existence of a larger surface area..
Go through the cork with the copper wire. Make sure the curly part is towards the top of the electroscope.
Make a slight bend at the lower end of the copper wire, in the shape of an L.
Cut the two aluminum foil into triangles with a base of about 3 centimeters. It is important that both triangles are identical.
Make sure the lamellae are small enough not to come into contact with the inner walls of the bottle..
Include a small hole in the upper corner of each foil and insert both pieces of aluminum into the lower end of the copper wire..
Try to keep the foil sheets as smooth as possible. If the aluminum triangles break or wrinkle too much, it is better to repeat the samples until the desired effect is obtained..
Place the cork on the upper edge of the bottle, very carefully so that the aluminum foils do not deteriorate or the assembly made is lost..
It is extremely important that both lamellae are in contact when sealing the container. If this is not the case, then you will have to modify the bend of the copper wire until the sheets touch each other..
To prove it, you can apply the theoretical notions previously described throughout the article, as detailed below:
- Make sure the electroscope is not charged: to do this, touch it with a metal rod to eradicate any remaining charge on the device.
- Electrically charge an object: rub a balloon against a woolen cloth to charge the surface of the balloon with electrostatic charge.
- Bring the charged object closer to the copper spiral: with this practice the electroscope will be charged by induction, and the electrons from the globe will be transferred to the electroscope.
- Observe the reaction of the metal plates: the aluminum foil triangles will move away from each other, since both plates share a charge of the same sign (negative in this case).
Try to carry out this type of test on dry days, since humidity tends to affect this type of home experimentation because it makes it difficult for electrons to pass from one surface to another..


Yet No Comments