The rule T is a tool for drawing technical, mechanical, architectural and electrical plans on paper. It consists of a rule at the end of which another shorter rule is attached as a square, forming a right angle with the first.
The longest rule is called Body and the shortest is called head. The shape of the set resembles the letter t capital letter (T) and hence its name. The head protrudes from the ruler, so that it can be supported and in contact with the edge of the drawing table.
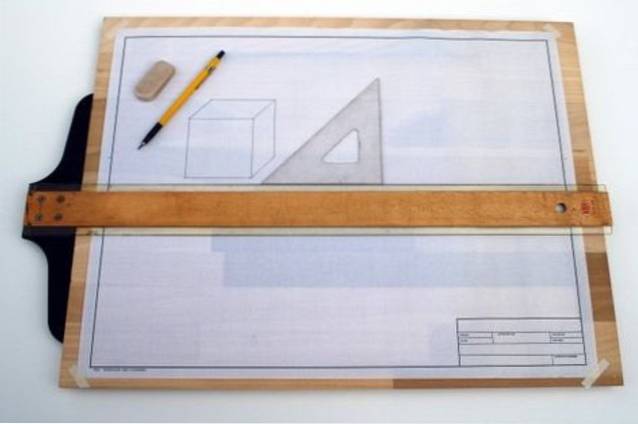
Figure 1 shows a T-ruler placed on a drawing board. When the head of the T-rule is in contact with the edge or edge of the table, the main rule allows the drawing of lines perpendicular to the edge of the table..
By moving the head along the edge of the table, then another line can be drawn perpendicular to the edge and therefore parallel to those that were previously drawn..
Article index
As indicated at the beginning, rule T is characterized by having two rules: a major and a minor.
The smaller rule is attached to the first one in such a way that their edges form a right angle (90º) between them. It has a straight edge and the other usually has a curved shape, as seen in the image.
This shorter ruler is called the head or head of the T-ruler, while the main ruler longer than the head is called the body or simply the ruler. With it, the straight lines are made on the paper that is between the drawing table and the body of the ruler.
The screed can be made of various materials and the choice of one of them depends on the end use that is given and the preferences of the user..
-The wooden T rule, It has a completely flat main body or ruler and is ideal for drawing with graphite pencils, crayons and mechanical pencils. But they are not recommended for drawing with pencils or with rapidograf, since the ink can run under the ruler.
-Combination of materials, for example wood and plastic. In these, the body or main rule is made of plastic, which is placed between another two wooden rules of less width, as a sandwich.
The plastic ruler is generally transparent and protrudes slightly from the main ruler. As there is a gap between the plastic edge of the main ruler and the paper on which it is drawn, there is no disadvantage that the ink from the pen or the rapidograf drips under the edge of the ruler, due to the effect of surface tension..
-Pelastic (generally transparent), they are usually smaller than those made of wood or wood-plastic, due to the fact that the material is more fragile and tends to flex. The plastic T-rulers are the ones that are usually used for school work, on surfaces less extensive than a drawing board, such as the desk.
-TOscratch stainless, They are intended for industrial use as they are used to trace on sheet metal or on glass, generally using a diamond or steel tipped cutter or plotter..
With the T rule you can draw straight lines parallel to each other. On the other hand, if it is used in combination with a set of squares, which rest and slide on the T rule, it is then possible to construct lines perpendicular to those drawn directly with the T rule..
Also, in combination with the square (another essential tool for the draftsman), oblique lines can be drawn with respect to the main rule of the T with angles of 45º, 60º and 30º..

1.- To use the T rule, you need a drawing board or table where the sheet of paper on which the drawing will be made will be fixed with self-adhesive tape..
2.- Before starting to use the T-rule, it is convenient to verify that the head of the same has no play (or movement) with respect to the body or main rule. If there is some movement between these two parts, the screws must be tightened, always making sure that the two parts form 90º. This check can be done with a square.
3.- If the draftsman is right, he must rest the head of the T-ruler against the left edge of the drawing board or table and slide the ruler up or down with the left hand, making sure that the head is always supported on the edge or edge of the board.
If the draftsman is left-handed, he must place the head towards the right side and make the strokes with his left hand..
4.- Before definitively fixing the sheet of paper to the board, it must be verified that the horizontal of the paper (the lower edge of the same) follows the same direction of the rule. If there is any difference, the sheet of paper should be rotated until it is perfectly aligned. Then definitively fix the paper to the board with adhesive tape.
5.- With the ruler, horizontal lines can only be made, supporting the pencil on the edge of the ruler and tracing from left to right with the pencil inclined to the right, while the left hand keeps the ruler resting on the left edge of the board..
If you are left-handed, everything must be reversed, that is, trace with your left hand and fix with your right hand to the right edge of the board..
In the previous section it was explained how to make horizontal strokes directly with the T ruler.
In case you want to make vertical lines, that is to say perpendicular to the ruler, you must use an auxiliary square that rests on the rule T. The vertical line is made by sliding the pencil along the perpendicular edge of the square..
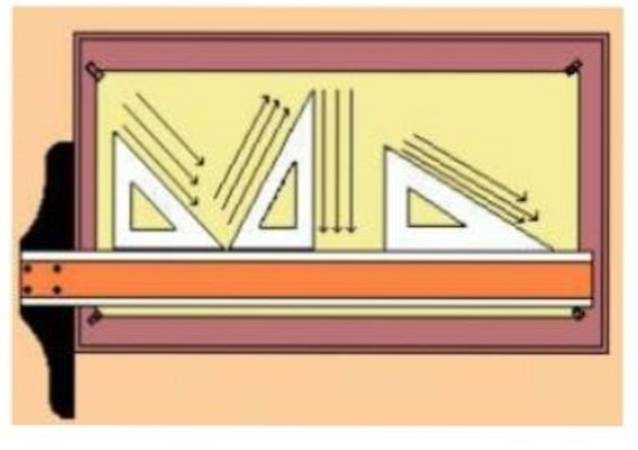
For oblique lines it is also necessary to use the squares in conjunction with the T rule..
There are two drawing squares: one is an iso-right triangle, that is, it has two 45º angles, and one is 90º. The other is a scalene right triangle whose angles are 30º, 60º and 90º, also known as a bevel..
The appropriate square should be selected depending on the angle of the oblique line to be drawn. By sliding the square on the T rule it is possible to draw a set of oblique lines parallel to each other.


Yet No Comments