The oval symmetric is defined as a flat and closed curve, which has two perpendicular axes of symmetry -one major and one minor- and is made up of two circumferential arcs equal two by two.
In this way, it can be drawn with the help of a compass and some reference points on one of the lines of symmetry. In any case, there are several ways to draw it, as we will see later.
It is a very familiar curve, since it is recognized as the contour of an ellipse, this being a particular case of the oval. But the oval is not an ellipse, although sometimes it looks very similar to it, since its properties and layout differ. For example the ellipse is not constructed with a compass.
Article index
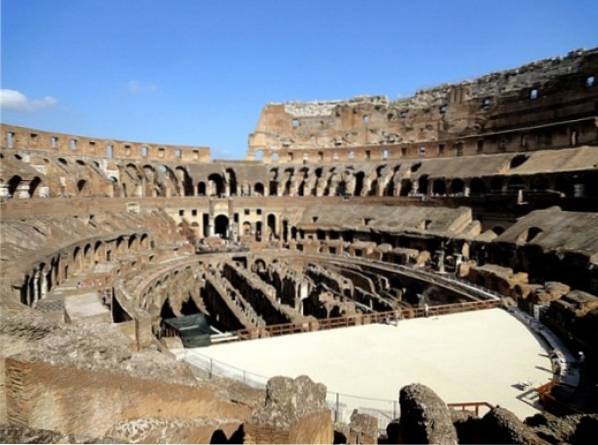
The oval has very varied applications: architecture, industry, graphic design, watchmaking and jewelry are just a few areas where its use stands out..
The most outstanding characteristics of this important curve are the following:
-It belongs to the group of technical curves: it is drawn forming circumferential arcs with the help of a compass.
-All its points are on the same plane.
-Lacks curves or loops.
-Its layout is continuous.
-The curve of the oval should be smooth and convex.
-When drawing a line tangent to the oval, all of it is on the same side of the line.
-An oval only admits two tangents parallel at most.
There are several methods of constructing ovals that require the use of a ruler, square, and compass. Next we are going to mention some of the most used.
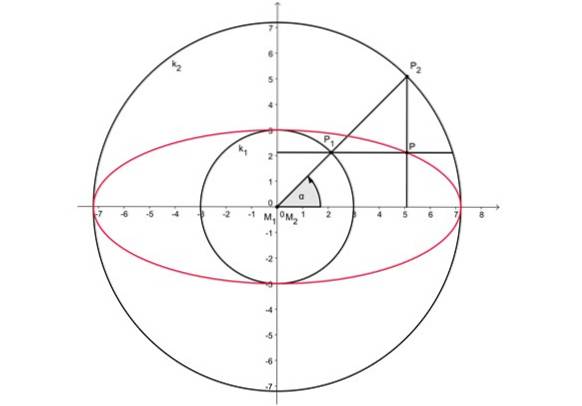
Figure 2, above, shows two concentric circles centered at the origin. The major axis of the oval measures the same as the diameter of the outer circumference, while the minor axis corresponds to the diameter of the inner circumference.
-An arbitrary radius is drawn to the outer circumference, which intersects both circles at points P1 And ptwo.
-Then point P is projectedtwo on the horizontal axis.
-Similarly, the point P is projected1 on the vertical axis.
-The intersection of both projection lines is point P and belongs to the oval.
-All the points in this section of the oval can be plotted in this way.
-The remainder of the oval is traced with the analogous procedure, carried out in each quadrant.
Next, other ways of constructing ovals will be examined, given a certain initial measurement, which will determine their size..
Draw with the help of a ruler and a compass an oval, known as its major axis, whose length is 9 cm.
In Figure 3, shown below, the resulting oval appears in red. Special attention must be paid to the dotted lines, which are the auxiliary constructions necessary to draw an oval whose major axis is specified. We are going to indicate all the necessary steps to reach the final drawing.
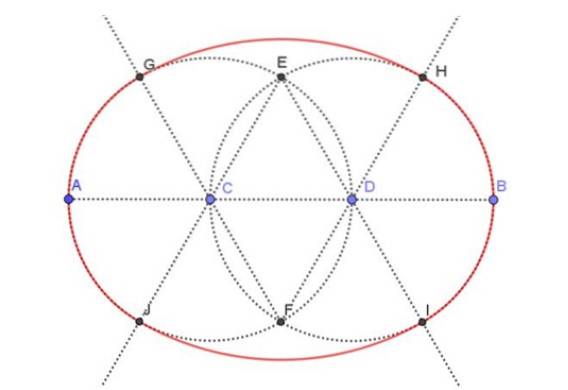
Draw with a ruler the segment AB of 9 cm.
Trisect segment AB, that is, divide it into three segments of equal length. Since the original segment AB is 9 cm, the segments AC, CD, and DB must each measure 3 cm.
With the compass, centering at C and opening CA, an auxiliary circumference is drawn. Similarly, the auxiliary circumference with center D and radius DB is drawn with the compass..
The intersections of the two auxiliary circles built in the previous step are marked. We call it points E and F.
The rays of the previous step intersect the two auxiliary circles at points G, H, I, J respectively.
With the compass center is made in F and with opening (or radius) FG the arc is drawn GH. Similarly, centering at E and radius EI, the arc is drawn IJ.
The union of the arches GJ, JI, IH Y HG form an oval whose major axis is 9 cm.
We proceed to erase (hide) the auxiliary points and lines.
Draw an oval with a ruler and compass, whose minor axis is known and its measure is 6 cm.
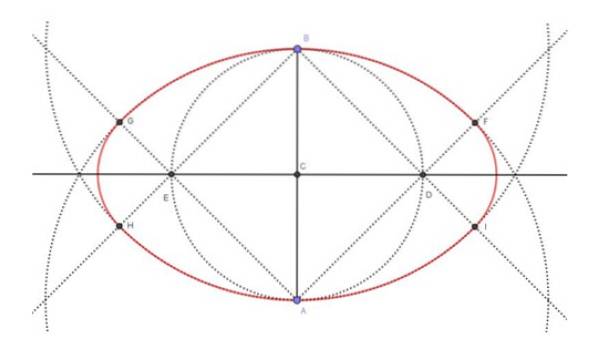
The 6 cm long segment AB is traced with the ruler.
With the compass and the ruler, the bisector is traced to segment AB.
The intersection of the bisector with segment AB, results in the midpoint C of segment AB.
With the compass the circumference of center C and radius CA is drawn.
The circumference drawn in the previous step intersects the bisector of AB at points E and D.
The rays [AD), [AE), [BD) and [BE) are drawn.
With the compass, the circumferences of center A and radius AB and that of center B and radius BA are drawn.
The intersections of the circles drawn in step 7, with the rays constructed in step 6, determine four points, namely: F, G, H, I.
With center at D and radius DI, the arc IF is drawn. In the same way, with center in E and radius EG, the arc GH is drawn.
The union of the arcs of circumference FG, GH, HI and IF determine the desired oval.

Yet No Comments